
Decision component
Express conditional logic as a readable decision table instead of chains of if-else transitions, with a catch-all rule for anything unmatched and a test run in Studio before it reaches a patient.
Decisions shape how a patient moves through a care flow. The Decision component is a node on the canvas that holds those decisions in one table, so the rules are explicit and easy to read.
Decision components handle your most complex routing logic
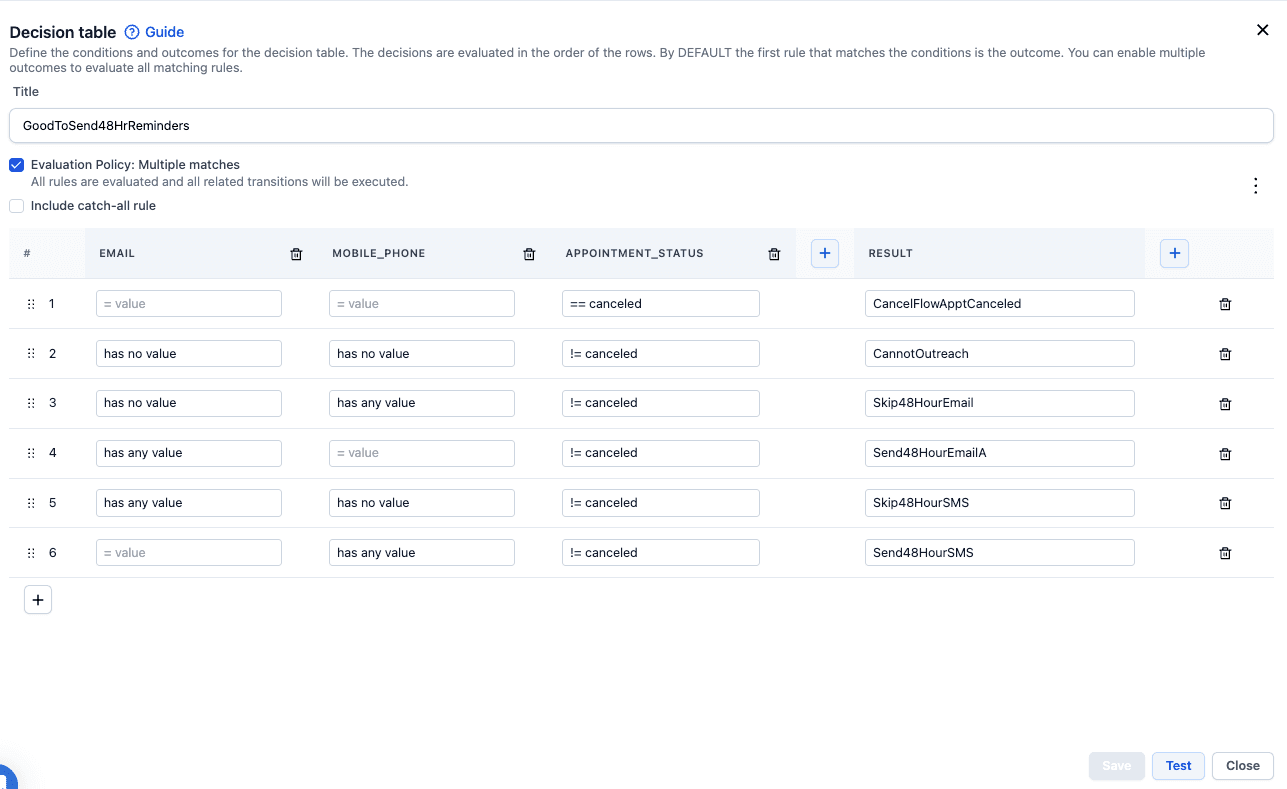
Use conditions on transitions for a single branch and a decision table for more than one.
Every condition and outcome sits in one table, visible at a glance rather than traced through a chain of transitions. Changing the logic means editing a row or adding one, instead of rewiring paths where a small mistake causes a subtle wrong turn. Rules stay readable as they grow, while a chain of if-else transitions gets harder to follow with every branch added.
The table also documents itself: a clinician or product manager can check the logic without a walkthrough from the person who built it.
A decision table pairs inputs with the outcome each rule produces
The Decision component is a node in the Studio sidebar. Drag it onto the canvas to add one, then open it to build its decision table.
The table has a column for each input and a row for each rule:
- Inputs are the data points the decision reads. Each one is tested with an operator such as equals, greater than, or contains. Studio suggests operators and data points as they are typed.
- Rules are the rows. The conditions in a row combine, so a rule matches only when every condition in that row is true.
- Results are the outcome a rule produces. A result is the path the care flow takes when the rule matches, and it appears as an output on the Decision node.
Rules are evaluated top to bottom in the order the rows appear.
A condition can also test against a list of values. in option_1, option_2 matches when the data point
holds either value, which keeps a rule to a single row instead of one row per option.
The evaluation policy sets how many paths a decision takes
The evaluation policy controls what happens when more than one rule matches:
- First match only, the default, stops at the first matching rule and follows one path. Use it when the branches are mutually exclusive.
- Multiple matches evaluates every rule and follows every matching path, so one decision can open several branches at once.
Rules that share an outcome give a decision its "or" logic
A rule matches only when all of its conditions are true, so a single row is always an "and". To express an "or", give two or more rows the same result.
For example, a care flow that escalates to a nurse on a high symptom score or a missed appointment needs
two rules that both produce the result Escalate.
Results with the same name collapse into one output on the Decision node, so the branch appears once no matter how many rules lead to it. Under multiple matches, both rules can match and the escalation still runs only once.
A decision without a catch-all rule fails when nothing matches
A catch-all rule, the "else" row, produces an outcome when no other rule matches. Turn it on with Include catch-all rule.
Always add one. If no catch-all is set and no rule matches, the Decision component fails during orchestration.
Test a decision in Studio before a patient reaches it
A Decision component can be tested directly in Studio, which confirms which branch a given set of answers takes. It can also be reused within the same care flow, so the same logic isn't rebuilt everywhere it's needed.