
Collect files and images
Let respondents upload documents and images through a form, and connect the Google Cloud Storage or Amazon S3 bucket those files are written to.
Forms can collect documents and images using the File upload and Image upload question types. A patient can photograph a wound, or upload a referral letter or an identity document.
Uploaded files never live in Awell. They go straight from the respondent's browser into a storage bucket the organization owns, and Awell keeps a URL pointing at them. So there are two halves to this: someone sets up the bucket once, and then anyone building a form can point questions at it.
Storage has to be set up first
These question types don't work until file storage is set up on the Integrations page of the organization. Choose one of these:
- Connect the organization's own storage provider, Google Cloud Storage or Amazon S3. This is preferred: the uploaded files stay under the organization's control.
- Let Awell store them. Where there's no storage provider, email support@awellhealth.com to get this set up.
The rest of the setup is under Set up file storage below.
One file per question
Both question types support one file each. For both sides of an identity document, use two questions, one for the front and one for the back.
Set the destination and file types per question
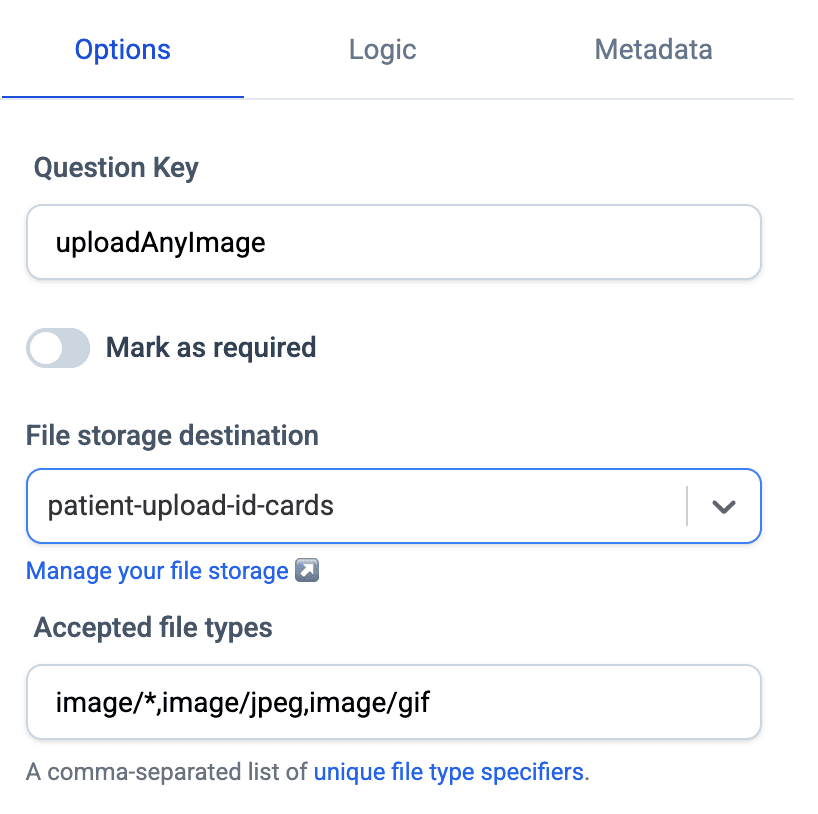
For each upload question, on the Options tab:
- Select the file storage destination, one of the configurations from Integrations. The Manage your file storage link next to it opens that page.
- Set the accepted file types, as a comma-separated list of
unique file type specifiers
such as
image/*,image/jpeg,image/gif.
Restrict file types to formats the care team can open.
Shelly can write the file type list for you. See Build forms with Shelly.
Set up file storage
An organization can have more than one file storage configuration, each pointing at a different bucket. Set them up on the Integrations page. Both Google Cloud Storage and Amazon S3 are supported.
A configuration name can't be changed after it's created, so pick one that will still make sense
later, such as patient-upload-id-cards rather than bucket-2.
Google Cloud Storage
Step 1: Create the bucket
Create the bucket in the Google Cloud console. Note the bucket name; it goes into Awell in step 4.
Step 2: Grant Awell write access to the bucket
In the bucket, click Permissions, then Grant access, and give the Storage Object Creator and Storage Object User roles to Awell's service account. The account differs per environment:
| Environment | Service account |
|---|---|
| Sandbox | awell-file-storage@awell-sandbox.iam.gserviceaccount.com |
| Production EU | awell-file-storage@awell-production.iam.gserviceaccount.com |
| Production UK | awell-file-storage@awell-production-uk.iam.gserviceaccount.com |
| Production US | awell-file-storage@awell-production-us.iam.gserviceaccount.com |
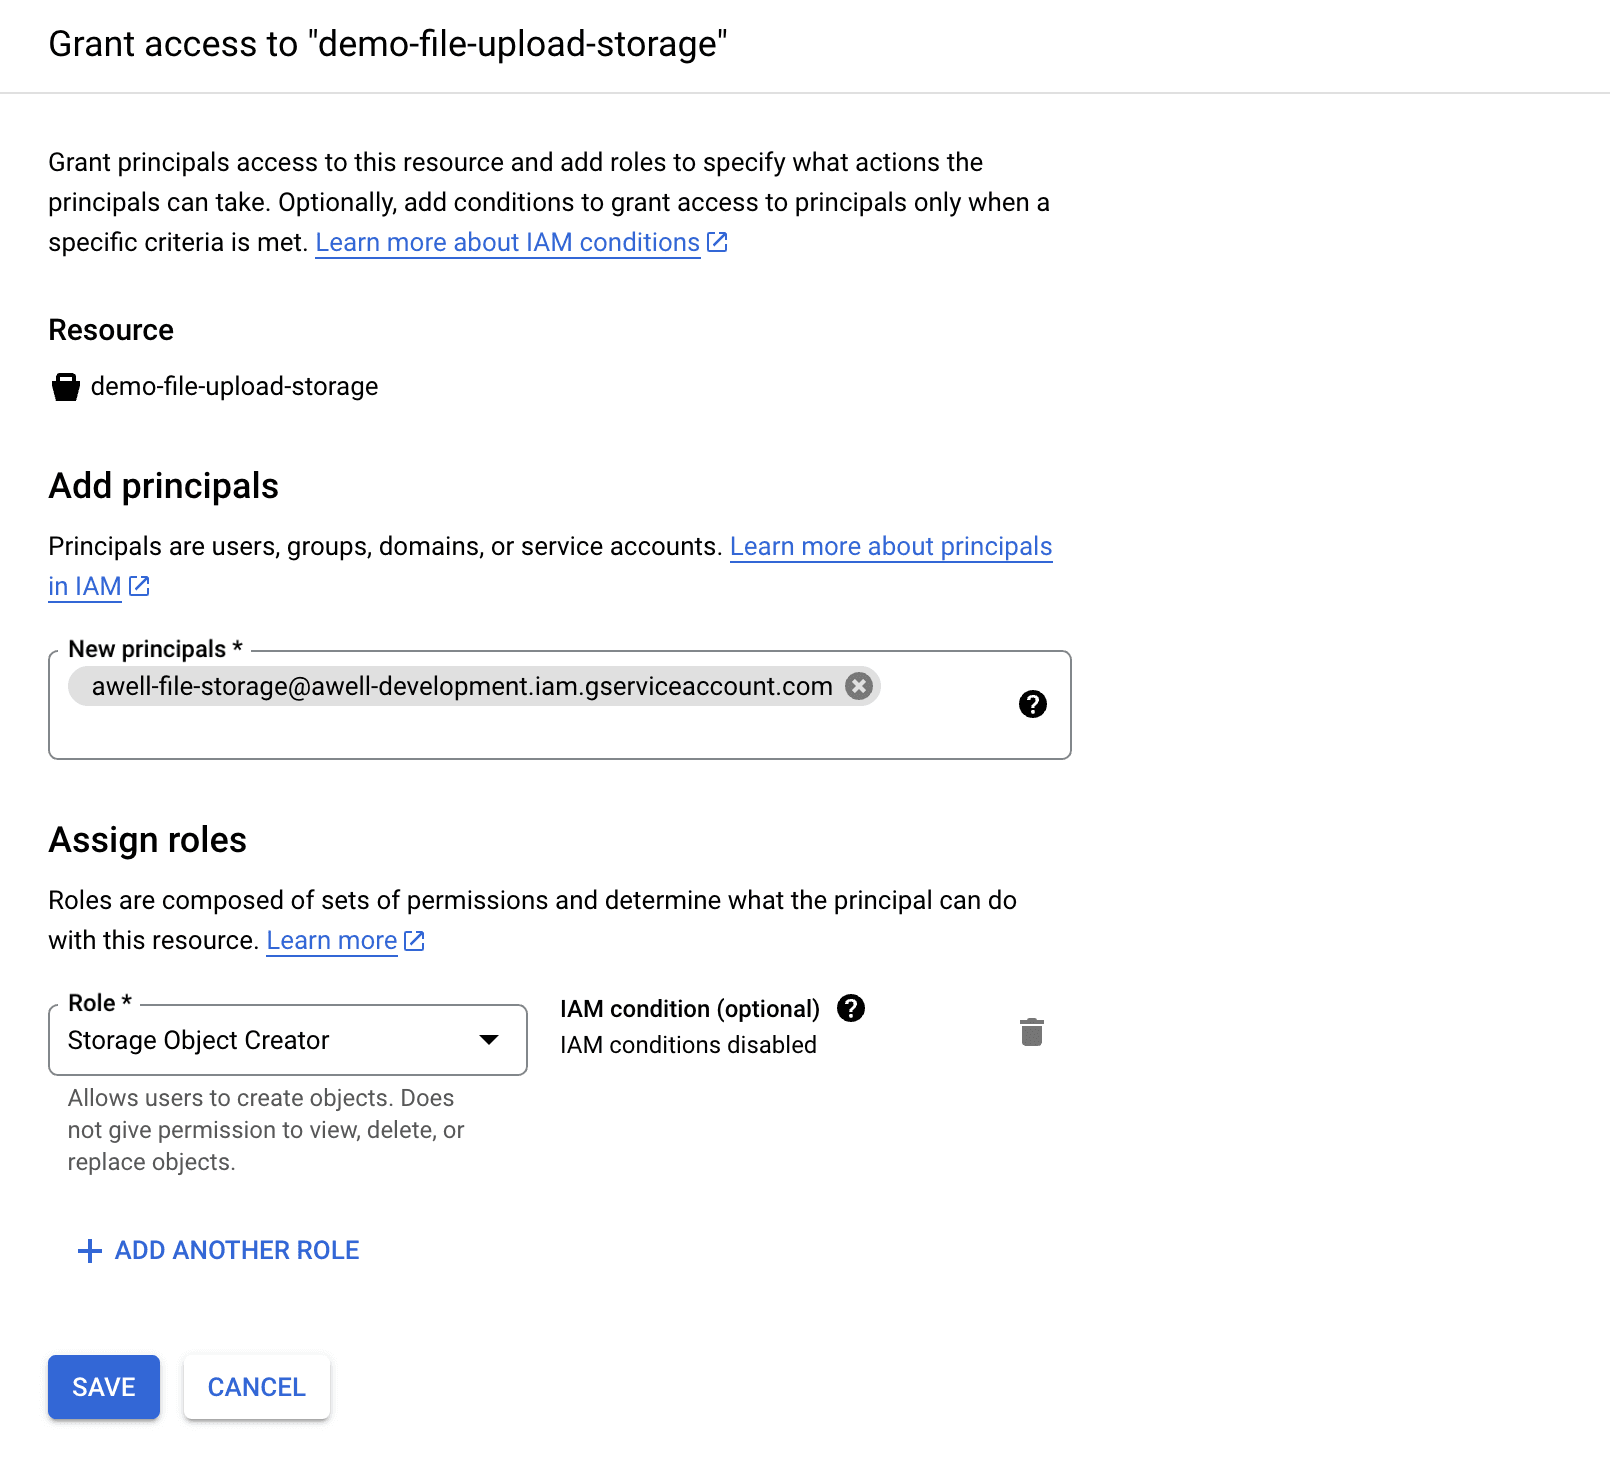
These roles let Awell write objects into the bucket. They don't let Awell read them back.
Step 3: Allow CORS on the bucket
Files are uploaded straight from the browser, through Awell Care or Hosted Pages, so the bucket has to allow Cross-Origin Resource Sharing, or CORS:
- Install the Google Cloud SDK CLI.
- Log in with
gcloud init. - Create a
cors.jsonfile with the config below. - Apply it with
gsutil cors set cors.json gs://{ YOUR_BUCKET_NAME }. - Confirm it with
gsutil cors get gs://{ YOUR_BUCKET_NAME }.
[
  {
    "origin": ["*"],
    "responseHeader": ["*"],
    "method": ["PUT"],
    "maxAgeSeconds": 3600
  }
]
Step 4: Finish the configuration in Awell
Back in Awell, give the configuration a name, enter the bucket name and a description, and save.
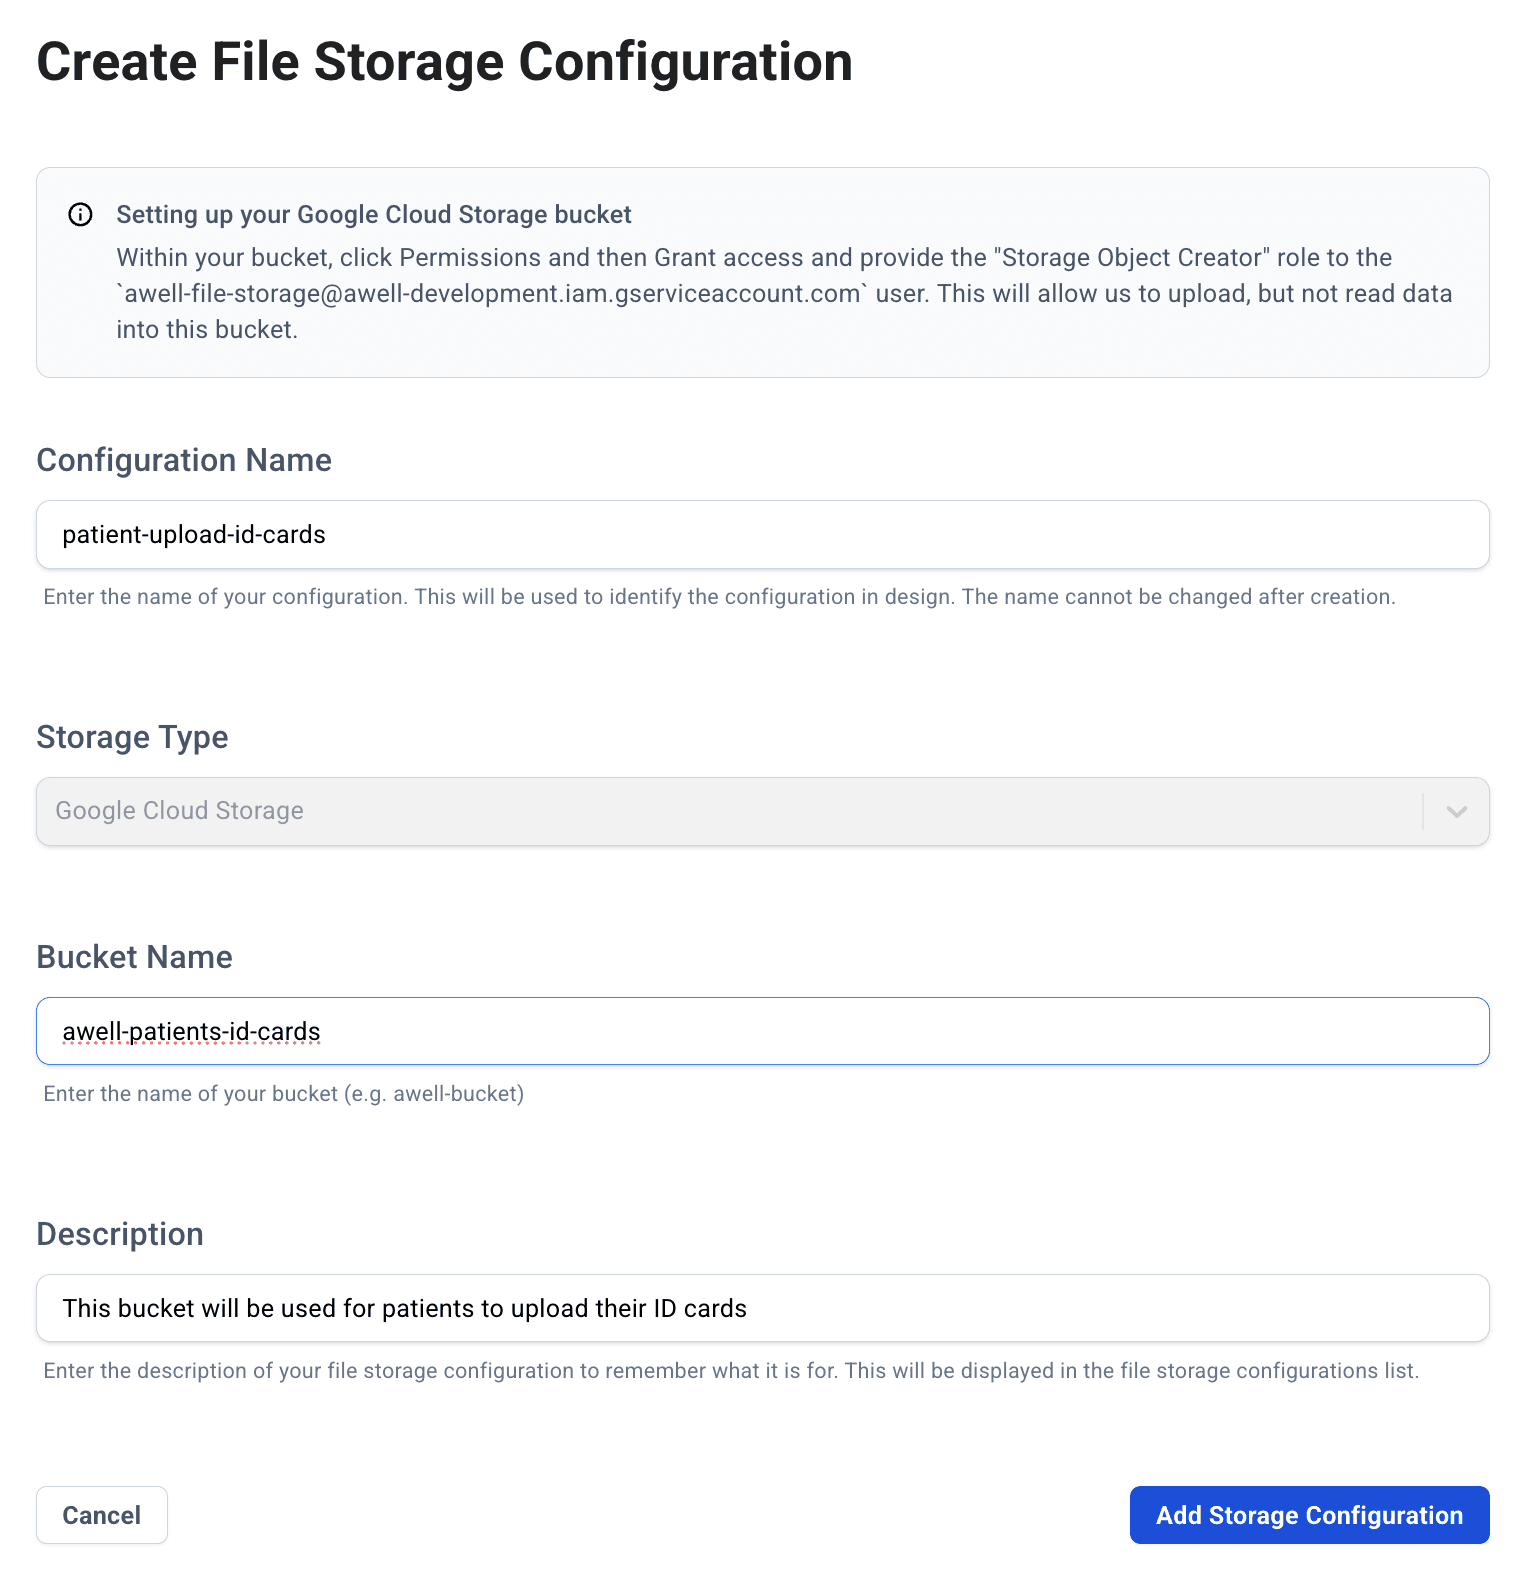
The configuration is now selectable as a file storage destination on any upload question.
Amazon S3
Step 1: Create the bucket
Create the bucket in the AWS console. Note the bucket name and the region; both go into Awell in step 5.
Step 2: Allow CORS on the bucket
Files are uploaded straight from the browser, through Awell Care or Hosted Pages, so the bucket has to allow CORS. Keep blocking all public access to the bucket.
- Go to the Permissions tab of the bucket.
- Find the Cross-origin resource sharing section, marked CORS, and edit the configuration.
- Add the config below, listing the domains uploads will come from.
*allows all of them.
[
  {
    "AllowedHeaders": [
      "*"
    ],
    "AllowedMethods": [
      "PUT"
    ],
    "AllowedOrigins": [
      "https://care.us.awellhealth.com",
      "https://hosted-pages.yourdomain.com"
    ],
    "ExposeHeaders": [
      "ETag"
    ],
    "MaxAgeSeconds": 3000
  }
]
Step 3: Create an IAM user that can write to the bucket
Create an IAM user, or reuse an existing one, and grant the user or their group a policy that writes
objects to the bucket. Replace your-s3-bucket-name with the real bucket name:
{
    "Version": "2012-10-17",
    "Statement": [
        {
            "Sid": "AwellDirectUploads",
            "Effect": "Allow",
            "Action": "s3:PutObject",
            "Resource": "arn:aws:s3:::your-s3-bucket-name/*"
        }
    ]
}
Step 4: Generate an access key for the IAM user
- Go to the Security credentials tab for the IAM user.
- Under Access keys, click Create access key.
- Choose Application running outside AWS as the use case.
- Describe the key, for example "Awell direct upload".
- Click Create access key.
- Copy the Access key and Secret access key, or keep the page open until step 5.
Step 5: Finish the configuration in Awell
Back in Awell, give the configuration a name, then enter the bucket name, the region, the access key, the secret access key, and a description, and save.
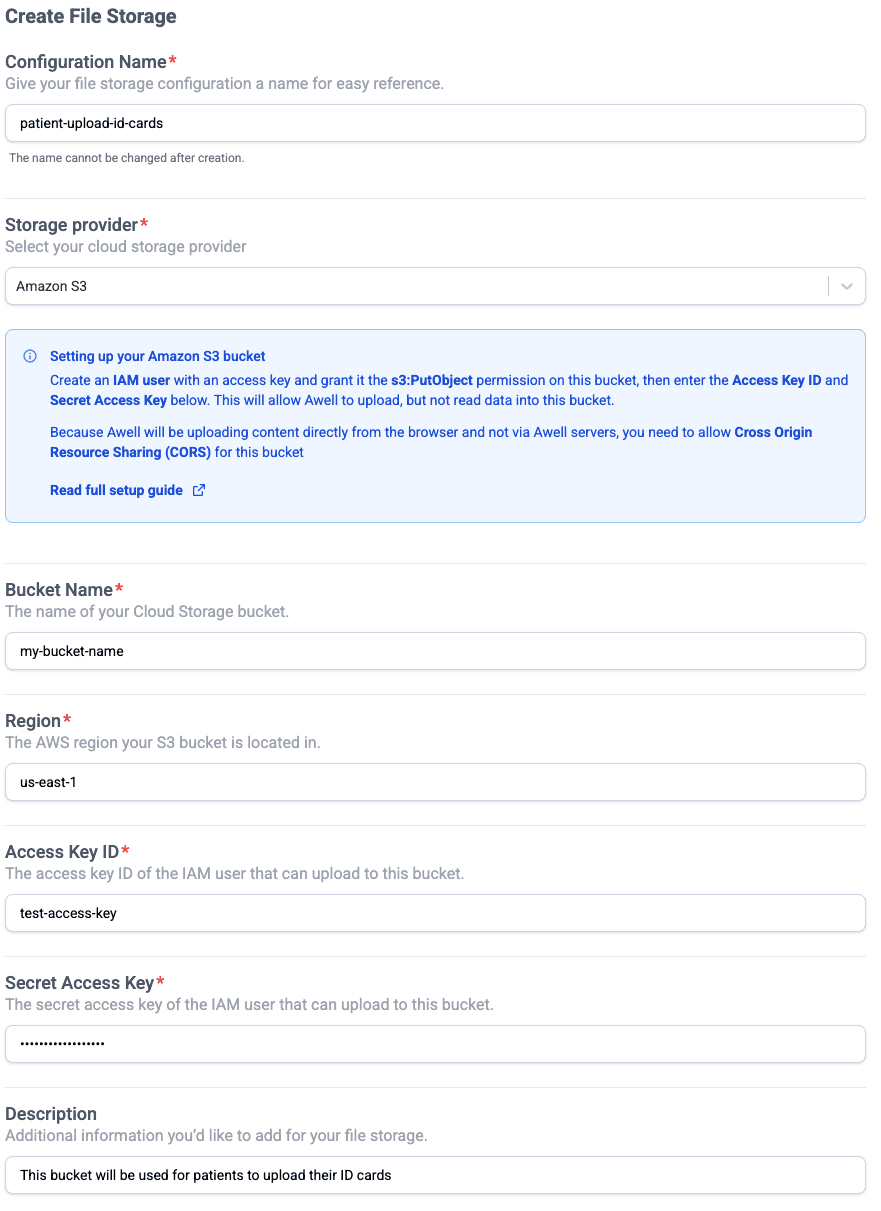
The configuration is now selectable as a file storage destination on any upload question.
How uploaded files are named
The original filename is prefixed with a UNIX timestamp when the file is written to the bucket. Nothing else is added: the uploaded objects carry no other metadata.
That makes the bucket itself the only organizing tool available, so set up several configurations and route different upload questions to different buckets. It's easier to keep one bucket of ID cards tidy than one bucket of everything.
For richer metadata or a different file layout, email support@awellhealth.com.
Getting at the uploaded files
Once a respondent uploads a file, the care team or another system usually needs to get at it.
Reference by URL. Awell stores the URL of the uploaded file, and that URL can be used inside the care flow or passed to another system such as an EMR. If the bucket is public, anyone with the URL can open the file. If the bucket or folder is private, the receiving system needs a signed URL. Email support@awellhealth.com to work out that setup.
Binary upload. To send the file's contents to another system rather than a link to it, email support@awellhealth.com.
Next steps
Next: Add a calculation to turn collected answers into a score.
Before going live with uploads in Production, check the go-live checklist. File storage is configured per environment, so a Sandbox bucket does not carry across.
Import and export form questions
Bring questions in from the validated-questionnaire library or a JSON file, including a spreadsheet template that maps to the right format.
Add a calculation
Turn data collected in a care flow into a score, using a validated calculation from the Awell Score suite, then configure its inputs.